
Sincere apologies for any image copyright infringements! These blogs were created at the time I was unaware of the copyrights. If you want me to take down any image, feel free to reach out to me @ technopains@gmail.com. Keep the Subject as 'Image Copyright Issue' Thank you for understanding!
PS: Today as of 2023, when I read this blog, I feel there's no intermediate level coding in HTML. HTML is all beginner stuff and ofcourse its one can keep themselves up to date with latest tags to be as efficient as possible.
Having said that, I strongly believe this blog is going to be extremely helpful for a beginner programmer in HTML.
Hi everyone, I hope you’re all doing great and learning tons of new things in this COVID-19 lockdown.
So this is my second blog on getting comfortable with HTML. Today we will start with tables. Again, it’s all simple, especially when you’re using a proper IDLE editor like the ones that I suggested in my previous blog.
Major tags useful while creating tables in HTML are:
<table><thead><tbody><tfoot><th><tb><tr>
Other than that, you may find a lot of other heads for decoration purposes, but trust me you don’t need them in HTML. CSS can do it a lot better, so once we reach there, we’ll be exploring that as well.
<table> tab is the basis of creating tables and then <thead>,<tbody> and <tfoot> are for header, body and footer as their name suggests. Although, <th>, <tb> are used to identify head and body contents and if you don’t put <thead> and <tbody>, the browser will itself identify the content based on <th> and <tb> tags, but it’s always healthy practice to create divisions based on <thead>, <tbody> and <tfoot> which helps us in further customization while writing CSS scripts.
Also, <tr> is used to separate the row data. You can consider it having the same role what <br> does in <p> or any other division in HTML. Multiple <tr> tags define the end of the row data. Also, one important point to note is that none of these tags are self-closing tags and so you have to end them with closing tags for each of them.
One nice parameter which actually can be achieved by CSS, but we prefer to do it via HTML is cell spacing. cell spacing argument is to be passed in the table itself and it creates spacing based on the pixel or percentage gaps.
Here’s a snap of a very simple table I have created:

You may embed tables into tables to create multiple table rows. You can try it as an exercise to grasp the concept of tables better. Note that for horizontal jump we use <tr> and for the vertical spacing we use <td>.
so your final output should be something like this:
Another interesting feature of HTML are forms. You can do so much of the customizations for communicating with your visitors using these forms. HTML forms can be used in many ways. Here I am specifically using it to create a user contact form. I’ll be taking the name, email address, message and their anonymity preference. The tags which I would be using are:
<form><label><input>
Note that all these 3 tags are also not self-closing tags and hence you have to close them manually unless you’re using a good IDlE which does this for you.
Some other attributes are required to be defined along with these tags, which you may keep as default as we’re not going to dive deep into them at the moment. For the moment we should know the basics of these attributes:
- Action attribute: This decides what action to perform on submission of the form. For example, redirecting to a page, or showing a pop-up. This attribute can be attached with any type of HTML or PHP or any certain script file.
- Target attribute: This decides the next action be performed on the same page or to open a new tab and then proceed. “_self” is to be used when the action needs to be performed on the same page else you may go with “_blank”.
- Method Attribute: This is all about GET and POST methods. To protect any information, POST is always a better choice as POST doesn’t display the message in the page address field.
So since now you’re well versed with the basics of form attribute, Now we will be moving to create the forms. I will recommend to use the above tags and experiment with different input types provided in HTML. Once you go through them, you can then proceed forward to build a nice form.
So that’s all about the basics of HTML. Let’s move on to publish the website on GitHub so that you can share it with your friends and acquaintances. Don’t worry, we will further improve it with CSS and JS and update the changes as well to reflect on the same site.
Hosting the Website to Github
Upload all your files to the GitHub repository. You can just drag and drop the files there if you’re new to GitHub. There are multiple tutorials on how to upload files to GitHub, like this one.
After uploading your repository, open it and you will see settings option on top as shown below:

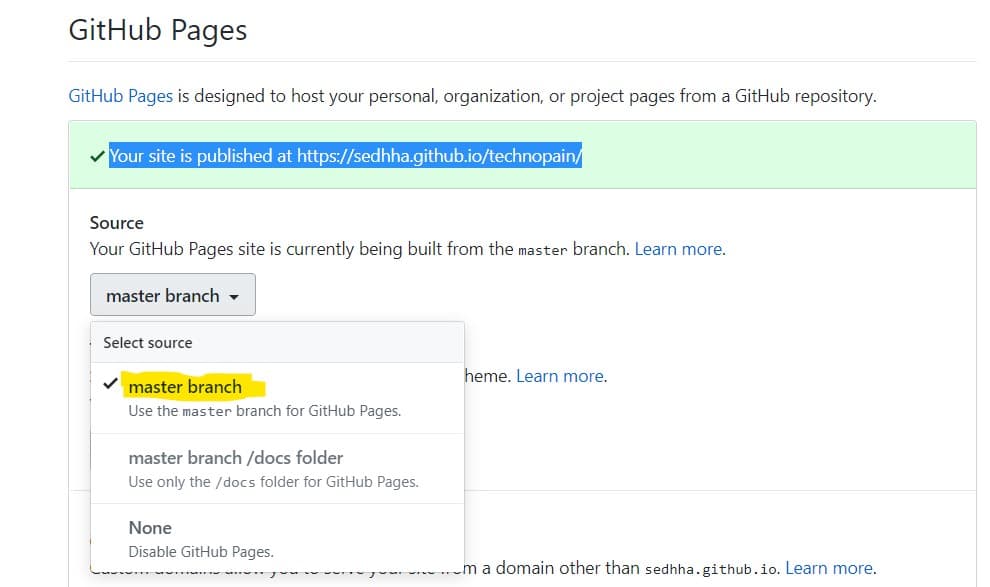
Once you click on settings a new window will appear. Scroll down until you see Github Pages as shown. Since I have already published it so it’s showing Your site is published at ###. You just need to go to Select source and change it to master branch and that’s it.
Now, wait for around 30 mins, while GitHub prepares your website and makes it ready to publish. This guide is very comprehensive as I am parallely sharing my experience while learning the same. There are high chances that I miss lots of things and so I urge you to discuss all of it in the comments.
Cheers!