
Sincere apologies for any image copyright infringements! These blogs were created at the time I was unaware of the copyrights. If you want me to take down any image, feel free to reach out to me @ technopains@gmail.com. Keep the Subject as 'Image Copyright Issue' Thank you for understanding!
Hey guys! I hope you’re all doing well. So in the pandemic COVID-19 situation, I am sure we all have been undergoing some changes in our day to day life. One can see the effect not just in the country, but worldwide as well.
If you’re studying, your colleges would have shut by now and if you’re working, you’re very likely to work from home. I am sure we all must be having our plans about how to spend these days and so I decided to start learning the basics of web dev. I have started with HTML and trying to replicate my website (that I created via WordPress), but this time using proper web dev.
Before I start with anything, I want you guys to inform with the pre-installations and setups I have done. I am using atom editor to compile my codes and below extensions suggested in this Udemy course (I highly recommend this course to beginners) to have a smooth experience:
Spoiler: Update in 2023: I don't use atom editor anymore! I am already loving VSCode so much!
- atom-beautify
- atom-ternjs
- autoclose-html
- emmet
- csslint
- pigments
- language-ejs
- atom-html-preview
- Sublime-Style-Column-Selection
- linter-eslint
The last three are optional but I’ll still suggest installing them all in a one go. Note that you may use any other IDLE (like VS editor) based on your own preferences.
So let’s begin. The three components of web-dev are:
- HTML: which acts as a skeletal structure.
- CSS: which is the one that takes care of looks and decoration of the website.
- JS: that is responsible for adding functionality to the website.
For a better sense of understanding, take an example of the entire human body. The skeleton of the human body is the HTML part of it. Skeleton is the supporting structure consisting of bones and joints.
Coming next, the skin and external hair and everything is CSS, which gives the entire body an external appearance. It decides about how your website will look.
Finally, the muscles and the organs are what JS does. It defines all sorts of functionality to your website and so you can perform actions like walking, running, sleeping, eating, etc.

Source: Pinterest
Since I have started with HTML, here in this blog I won’t be talking much about CSS or JS. Let’s get started with the basics of HTML . The two handy resources in this will be devdocs and w3schools. I highly recommend every beginner to take them as references wherever it is required.
The major HTML tags which I have used and learned till now are:
Heading tags (h1 to h6) Here is a demo of how it works:
Heading 1
Heading 2
›Heading 3
Heading 4
Heading 5
Heading 6
Paragraph
Note that these headings need to be closed and unlike self-closing tags (
) they always need to be closed.
Basics of HTML
Here’s a piece of code from my website:
<!DOCTYPE html>
<html lang=”en” dir=”ltr”>
<head>
<!–For more emojis refer this: https://apps.timwhitlock.info/emoji/tables/unicode–>
<meta charset=”utf-8″ name=”description” content=”This page is under construction!”>
<title>© Technopain🚀</title>
</head>
The first line:
<!DOCTYPE html>
is to specify that this is to be rendered using HTML 5. The next line is quite self-explanatory. It specifies the language as English and the direction of printing from left to right (ltr).
Any tag starting with “<!–” is a comment and will be ignored by the machine. Note that I won’t say that it would be ignored by compiler or interpreter as it is a markup language and even I am not sure to what do we exactly call it. 😛
Next, we’re defining meta charset as utf-8 encoding which is the most common across all the browsers and international websites. It’s the most recommended encoding to ensure it doesn’t screw up the rendering of your site in other pages.
Next, I have added the meta description as this page is under construction. This is the same description which can be handy while you want your website to rank up and it appears as a meta description while the search happens. Here’s an example:
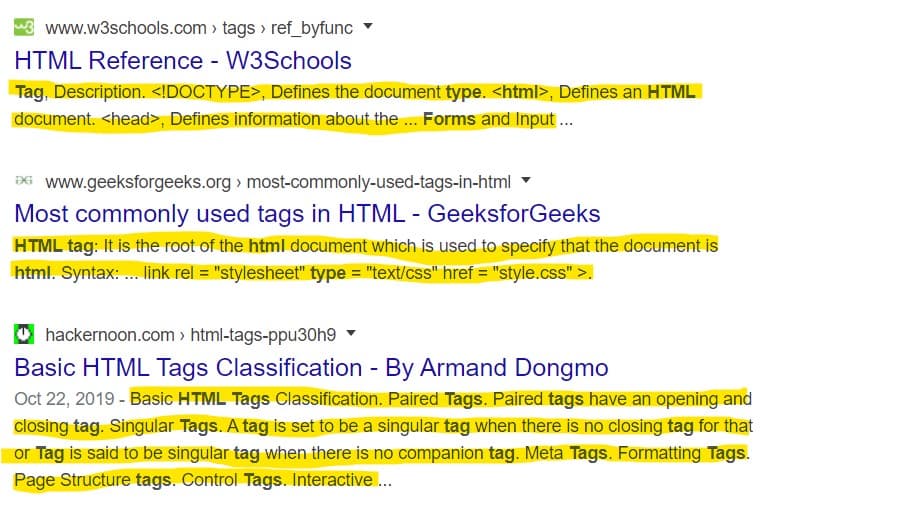
As you can see, the part marked in yellow is the meta description and appears every time your website appears in search results. Note that this part is quite useful while doing SEO and so it is always better to add your major keywords without increasing the length of the meta description much.
The title is the part that appears in the tab. Here I have written TECHNOPAIN, note that emoji I have used is supported in “utf-8” encoding and so I am able to render it to the tab as shown below:

Now coming to the body, we have almost used similar tags except for new tags like:
<br>

<a href=””>

<i> / <em> / <b> / <strong>

<hr>

<ul> / <ol>

<li>

<img src=””>
I can explain them all one by one, but I believe you will get much accurate definition of the same on devdocs or w3schools, so try referring them and understand it properly. In case you still feel like something goes hazy, do let me know here in comments and we will explore it together.
So here’s my WordPress website:
And here’s what I have done from HTML so far:
know it looks horrible at the moment, but as we proceed, I’ll keep improving and updating. I have added and modified some changes in the HTML website, so it may not look exactly the same, but the end goal is to replicate what I have made using WordPress. Github repo for the work so far can be fetched here. That’s all for today, either I’ll keep adding the content here or update with new blogs in the same series. You may check the youtube video for the same.
Finally, I would like to say do new things, learn new things, be safe, have fun, but always take precautions and be healthy! See you guys.
Update: Here is the second article on web-dev and basics of HTML. do check it here.